One of the many problems with the V6 Fiero's cooling system is the design of the 84-87 fan relay. The fan relay is responsible for
turning on the radiator fan to prevent the engine from overheating, and also to support the A/C if that's on. If the
fan relay fails, your car will probably overheat sooner or later.
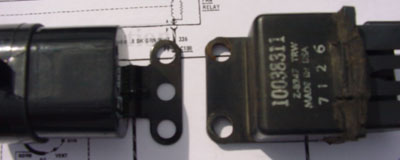
The problem with the early relay design is that the engineers considered the mounting area "inside the car", i.e. they used
unsealed Pack-Con connectors and sealed them more or less effectively with the well known goo. The bigger problem is the
relay itself though. The housing is a "cap-and-collar" design, with the collar being sealed with silicone. The silicone
deteriorates over time though, and water can collect on the collar an get into the relay housing, with fatal results.
The inside of the relay is prone to corrosion, and the relay may become unreliable, stick, or not work at all.
Although you can easily replace it, it sucks if you get stranded because of a failing relay.
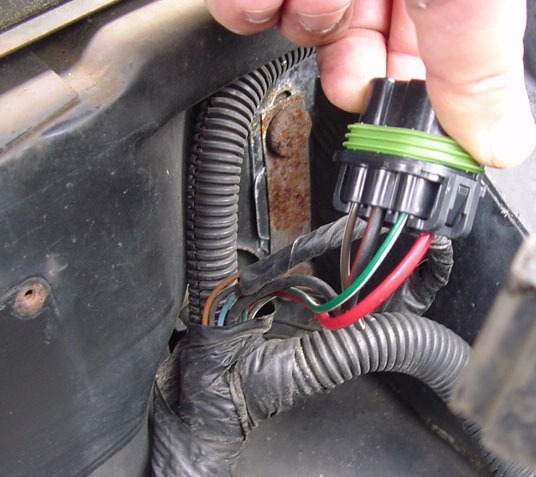
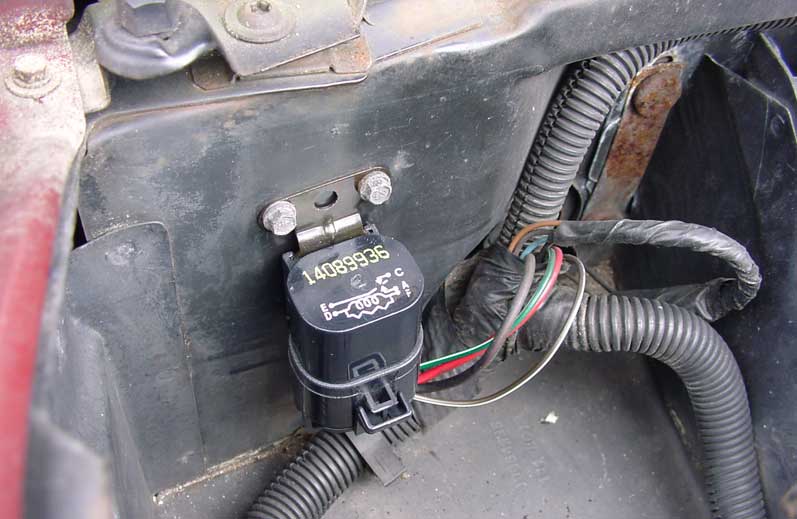
The 1988 V6 Fiero's fan relay is far superior to the previous design. The connector is a sealed Metripack connector, with each
wire going into the connector having a seal, and the connector having a separate seal to the relay. The relay itself does not
have a collar and no silicone, it is a one piece design that is virtually waterproof (provided the connector seals are intact).
If you catch the right part number, the mounting holes of the 88 relay are identical to the Fiero relay, so the upgrade is really
simple. But where to get the parts?
Corvette to the rescue
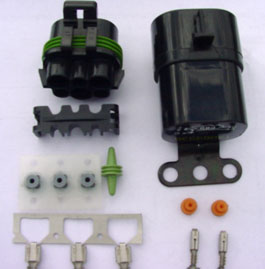
Fortunately Ecklers offers a
repair kit #55333, containing everything
you need for about $25. A connector only kit is also available. But you do need a good crimping tool for the upgrade.
First disconnect the battery. This is a must, since one of the wires we're going to deal with is hot at all times
and not fused except for a fusible link. Believe me, disconnecting the battery is less work than having to replace a
fusible link!
Next remove the LH headlight. I only removed the headlight, but not the motor assembly. Three bolts and you're set.
While you're at it, grease the bushings, they can probably use it.
Now you're ready to remove the old headlight relay (2 7mm bolts). To get as much of the old wires as possible, I opened up
the connector housing (it has a large latch on one side) and removed the old terminals with a terminal pick, and cut the
wires as close to the terminal pins as possible.
Then clean off any goo that's left on the wires. Slide the two big seals on the large diameter wires, and the two small
seals on the small diameter wires. This step is important, because if you forget it, there's no way to get them on later,
unless you sacrifice the terminals and another bit of wiring!
Next strip the insulation, but just as much as you need. If remove too much insulation, the core may interfere with the
terminal or the seal may be compromised, if you remove too little, you don't get a good crimp.
Before you actually crimp, check the orientation of the terminals in the connector housing as it will be when installed
with the relay. The wires are pretty stiff, and it will be impossible to rotate the terminal 180 degrees later. You
want them to slide right in. Check the pictures for info on which wire goes where (click on the images to get a more detailed
view).
First crimp the core and check the crimp is tight. Then crimp the seal. When all terminals and seals are crimped, insert
them into the proper connector cavities. Again see the images for reference, or better yet an 88 manual. The connector
cavities are labeled with the letters A-F by the way.
Testing the Installation
After the relay has been installed, but before you install the headlight, reconnect the battery. The fan should be
off. Now turn on the ignition (the fan should still be off). Finally turn on the A/C (Norm), and the fan should come on.
If it doesn't, disconnect the relay and troubleshoot.
If everything works, disconnect the battery again, reinstall the headlight and reconnect the battery (this is a safety
precaution when working on headlight motors, they're pretty strong and you don't want to lose a finger).
All in all, this is a very inexpensive insurance against fan relay failure, and the installation looks stock and is
identical to GM's solution on the 1988 Fiero.
As a final note I want to mention that Ecklers also carries the successor fan relay kit used on the '93-'99 Vette (P/N 30974), this is
the square type relay with a single mounting hole. It may work too, but from the look of it the terminals are too small
for the large diameter wires used on the Fiero, so I chose to go with the solution I described here. If anyone tries
to install this later kit, I'd be interested to know how the installation went.
There have been
visitors to this site since May 31, 2000.
 One of the many problems with the V6 Fiero's cooling system is the design of the 84-87 fan relay. The fan relay is responsible for
turning on the radiator fan to prevent the engine from overheating, and also to support the A/C if that's on. If the
fan relay fails, your car will probably overheat sooner or later.
One of the many problems with the V6 Fiero's cooling system is the design of the 84-87 fan relay. The fan relay is responsible for
turning on the radiator fan to prevent the engine from overheating, and also to support the A/C if that's on. If the
fan relay fails, your car will probably overheat sooner or later.