I don't know about you, but every second Fiero owner I come across
has cruise control problems. Even with my three Fieros, two had
a non-functioning and an intermittent cruise respectively.
Reason enough to give the Fiero cruise control system the treatment it
deserves and hopefully get you cruising again. Even if your cruise
is working fine now, it can start working intermittently in the
near future, so it may be useful to remember where this article is.
First, the Fiero used two fundamentally different approaches
to the cruise control. The 1984-1986 4 cylinder and all V6 Fieros
use a separate cruise control module. It is located behind the carpet
on the driver side center console. To access it you need to remove
the radio console and flip the carpet aside. Fortunately these units
don't go bad very often. I have never seen one break. But you may
need to access the module connector for troubleshooting. The second system
involves the 1987/88 4 cylinder Fieros with DIS. On these cars, the
ECM takes care of the cruise control functions. The advantage is
that you can troubleshoot the system with a scantool. The scantool
tells you whether or not brake and other switches are on or off.
The downside is that you need access to a scantool and if the problem
is in the ECM, replacement is expensive. But again, the ECM hardly
ever goes bad, the far more frequent reasons for cruise control
problems lie in the mechanical parts of the system. Before we get
into those, let's have a very general look at how the cruise control
system works.
The cruise control module (or ECM) is fed an electrical signal from
the speedometer, telling it the current speed. The Cruise control
stalk has a couple of switches telling the module whether it should
keep the current speed, accelerate or decelerate, or switch off.
The cruise module then controls the vacuum actuator ("servo") located near the
trunk. This actuator pulls on the throttle and can accelerate or
decelerate the car. To see how much it pulls, the position of the
actuator is fed back to the control module. The brake and clutch pedal
also have a switch connected to the cruise module to turn it off
as soon as you depress either pedal. The system is not too complicated,
but it is complicated enough to render it inoperative if only one of
those subsystems fail. And since it is not a vital system, it often
stays broken and that's why so many Fieros have a broken cruise control.
Let's assume that the radio fuse is not blown (this is the fuse
for the cruise control system):
The prime suspect if your cruise control is non-operative is the
cruise control stalk. The switches in the head module go into
the one wire that runs down the steering column. You don't need
a special tool to check it. Just disconnect the connector at the
steering column and plug in a known good switch. This one can be
from almost any GM car from the eighties, I use a switch from a
Fiero with the wiper-washer portion broken. Plug it into the harness
and go for a test drive. If the cruise works now, you need a new stalk.
Since the connector is already disconnected, tie some cable to it
and yank the stalk straight out of the steering column. Pull it all the way
out and use the cable you tied to the connector to feed the new
stalk's wire through the column. The new stalk easily snaps into place.
Hook it up and you're all set. The original part is discontinued,
but GM makes a replacement stalk that works just fine. The part number is
2511 1290.
If you don't want to spend the bucks for
a new stalk, you may not be out of luck. All you really need is the
"set" button on the cruise stalk to turn the cruise on, and you
can turn if off by tapping the brake or clutch pedal. So, if only the
blue or green wire inside the stalk are broken, just find those wires
in the cable coming from the stalk and solder them together. If the
green wire has power in accessory or run, and the red wire ("set") has 12
volts when you push the set button, your system will work again if you
only had a broken wire. And the beauty part is, once you can afford
a new stalk, you can just plug it in and you won't have to go through
any trouble to undo this workaround.
If you feel lucky you can also
attempt to repair the stalk (thanks to
Chuck Kichline for this tip).
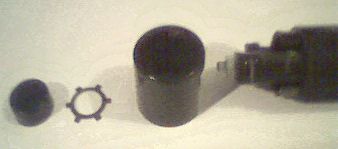
To disassemble the stalk, remove from the vehicle and remove the "set" button
with two small screwdrivers. If you look at the exposed part of the stalk,
you'll see the star shaped clip. Remove that with a small screwdriver as well.
Now the switch inside the stalk will move, but it will not come off. The
top part of the stalk is glued to the lower part (see picture). You need
to pry until the top part comes off (this is where you may break the
stalk, so be careful!). Once that's off, you can pull the switch from the
stalk. It usually breaks where the exits the stalk, so you can just cut and resolder.
Assembly is the reverse of the steps above.
The second suspect are the brake and clutch switches. This is especially
true for intermittent cruise operation. Usually you only need to readjust the
cruise control switch. Push it forward and let the brake (or clutch)
pedal push it back by itself. Don't push it back yourself, because if
you push it too far, you will get the same problem you are trying to fix.
Both switches should be closed and open only when you depress the pedals.
Another problem area is the speedometer. If your speedo doesn't work,
chances are that your cruise is broken too. This is because the speedometer
provides the speed signal to the cruise module. If the speedo does work
and you have a scantool, check if the scantool displays the proper speed.
If it does, you can be certain that the speedometer speed output works.
Our final focus will be the vacuum servo.
The vacuum canister is connected to the engine mainfold via a one way valve (you want to keep
the vacuum in there). There is nothing in the canister. For that purpose, a juice can would
do and you don't even have to paint it. Think of it as a vacuum "battery". This battery is
"charged" by the manifold vacuum. This vacuum is tapped into via a tee connector,
and goes into the cruise control servo. Disconnect this line and connect a vacuum gauge
to it. Start the engine, and check if there is vacuum. Now shut off the engine. The vacuum
should stay. If it doesn't, your vacuum tank is likely rusted and has to be replaced.
See if the check valve works. You should be able to blow air through it into the manifold,
but if you suck on it, the valve should close. Reconnect this line. If things work, you have
vacuum to power the cruise servo.
Okay. Now disconnect the cruise servo connector. We'll be checking the servo directly.
May I remind you that you're doing this at your own risk.
The black wire on the servo connector grounds the vacuum solenoids. Make sure it is clean and has a good
connection. Measure continuity from the vacuum (E/light green) wire to ground, and for the vent
connector servo side (A/dark blue) to ground. Apply 12V to the vent valve and ground terminal C
on the servo. Now the servo should be airtight.
Remove the vacuum line to the vent solenoid, and connect your vacuum pump there. Pump a little
and watch the servo pull on the throttle cable. If you stop pumping, it should hold the vacuum.
Disconnect the vent valve wire. The vacuum should go instantly and release the cable. Reconnect the
vent valve wire. With the engine running (or vacuum in the tank), shortly apply power to the
vacuum solenoid (E/light green). The vacuum should actuate the servo and pull on the cable.
If you remove the vent connector again, the vacuum should go. At this point you have
verified, that both vacuum and vent valves work, and that the servo does not leak.
Next, disconnect the vacuum pump from the servo and connect it to the other end of the hose
(the one going to the vacuum release solenoid). The purple wire on the solenoid should carry
power if the ignition is in run, and the power should go away if the brake pedal is depressed.
Check with a test light across the solenoid connectors (purple and black) that this is the case,
this also checks the black wire for ground.
Now let's assume that you have your vacuum gauge gauge/pump connected to the vacuum release solenoid
through the hose. With power applied to the solenoid, you should be able to generate a vacuum with the
pump, and it should hold. Have a helper step on the brake pedal, it should go. If it doesn't,
either the hose is cracked, or you have a bad vent solenoid.
Now you have checked everything you can easily check. All further
checks make the removal of the cruise module necessary. You need to check
for the voltages at the connector and repair the wiring or replace the
module as necessary. Both of these tests require a little more electrical
knowledge. But as I stated earlier, the two most common causes
for cruise failure are a defective stalk and problems with the clutch and
brake switches. So, don't be afraid of your cruise control system,
fix it and you'll be cruising again in no time!
There have been
visitors to this site since May 31, 2000.
 To disassemble the stalk, remove from the vehicle and remove the "set" button
with two small screwdrivers. If you look at the exposed part of the stalk,
you'll see the star shaped clip. Remove that with a small screwdriver as well.
Now the switch inside the stalk will move, but it will not come off. The
top part of the stalk is glued to the lower part (see picture). You need
to pry until the top part comes off (this is where you may break the
stalk, so be careful!). Once that's off, you can pull the switch from the
stalk. It usually breaks where the exits the stalk, so you can just cut and resolder.
Assembly is the reverse of the steps above.
To disassemble the stalk, remove from the vehicle and remove the "set" button
with two small screwdrivers. If you look at the exposed part of the stalk,
you'll see the star shaped clip. Remove that with a small screwdriver as well.
Now the switch inside the stalk will move, but it will not come off. The
top part of the stalk is glued to the lower part (see picture). You need
to pry until the top part comes off (this is where you may break the
stalk, so be careful!). Once that's off, you can pull the switch from the
stalk. It usually breaks where the exits the stalk, so you can just cut and resolder.
Assembly is the reverse of the steps above.