One of the most common causes of problems with the Fiero are ignition related, and
apart from bad spark plugs and frayed ignition wires the distributor is often at fault.
The ignition module can easily be replaced, but the pickup coil is usually as old as
the module, and this should be reason enough to rebuild the entire distributor - it's
not that difficult. This article illustrates the steps necessary to rebuild the
distributor, what to look out for, and hopefully the pictures help you in the process.
As always, I'd be grateful for a nice entry in my guestbook! Oh, you can click on
most images for a detailed view!
To do a rebuild, you should get the following parts (prices are from
The Fiero Store as of Oct 2002):
There are a few things to look out for when you remove the distributor.
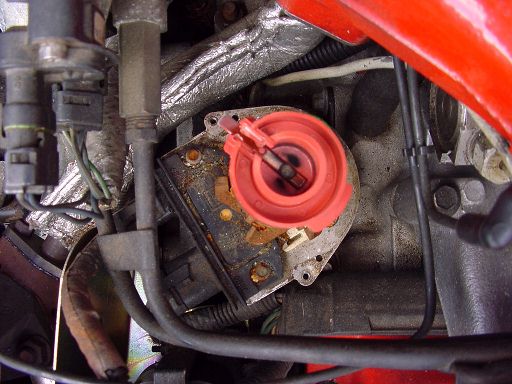
First of all, don't just yank out the distributor, but mark the position of the
rotor and cap, or just take a picture like I did. Then remove the three rear
ignition wires and get the cap out of the way. Now the position of the rotor
is very important, because this is exactly where it must point after reinstallation!
After you have removed the distributor, DO NOT CRANK THE ENGINE! (Why would you
anyway?) In any case, it doesn't hurt to disconnect the battery before you start.
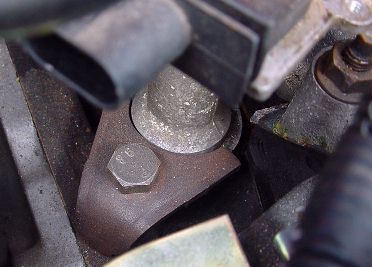
At the base of the distributor (remove the ignition coil to see this) is a 15mm bolt,
which clamps the distributor to the engine block. Remove the bolt and clamp, but do
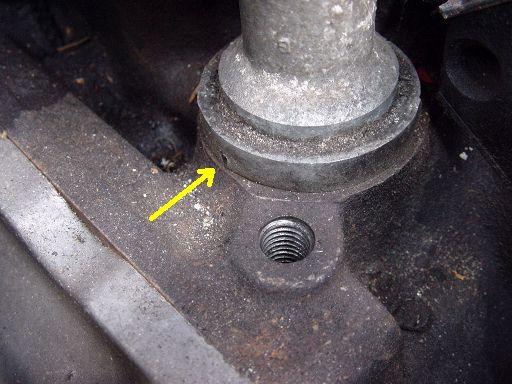
not rotate the distributor. Now you can see a marking (see image to the right), which
can aid in the installation later. This marking, together with the orientation of the
rotor, must be close to where they are now after installation. Remove the ignition module
and mounting screws, and then lift up the distributor, and remove it from the engine.
Disassembly
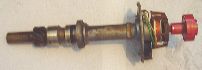
Now that the distributor is on the bench, take a close look at the gear.
There is a drilled hole on one side (see arrow in image). This hole is normally
on the same side that the rotor points to. Otherwise the rotor points in the exactly opposite
direction. In any case, note the orientation of this hole to the rotor, then remove the rotor
(which only fits one way on the shaft).
Now you can carefully punch out the spring that holds the gear to the shaft, but do
not drive it out all the way, only just as much as you need to remove the gear.
If you remove it all the way, it can be quite difficult to get it back into the gear.
If the gear is worn however, replace the gear and install the spring there on installation.
If you try to rotate the shaft, you will notice that is is difficult to turn.
This is because of the baked oil gunk that is inside the shaft. You can try to
use solvent or WD-40 to help you with the disassembly of the shaft from the
distributor. At some point it will come out. Now clean the shaft, all oil/tar
residue must go and the shaft must be shiny again. If you reinsert it into
the distributor, it must go in and rotate freely. Remove it again after
assuring it is clean.
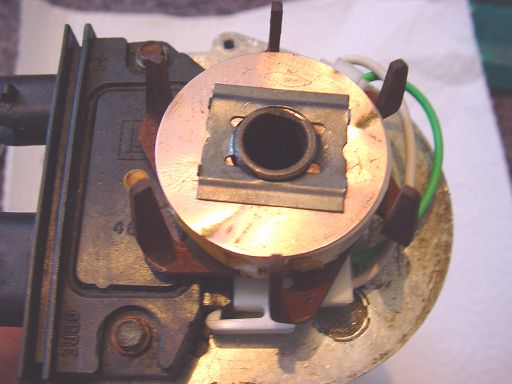
Now, the main task. The pickup coil is fastened with a spring. It is easy to get
off, but it comes off instantly, flies away preferably towards expensive objects
(see also: Murphy's Laws), and is razor-sharp. So protect your eyes and other valuables.
Under this spring is a copper shield, do not lose it or throw it away!
You can easily clean it, it looks better and is easy to do.
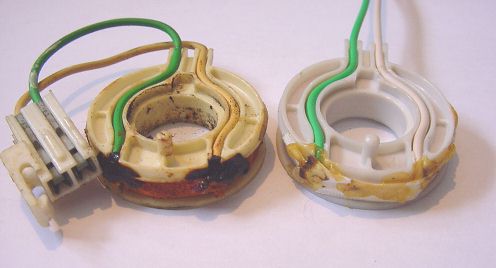
Now take a look at the old and new pickup coils: the plastic has aged and has become
brittle, the isolation is on it's way south, and the contacts have corroded.
Assembly
Behind the ignition module there are two sieves, clean them, and then install the
new pickup coil according to the included instructions. Do not omit the copper
shield! Make sure the
spring engages the groove it is supposed to go into. The result can be seen
to the right.
I have once heard from one Fiero owner that an Original AC/Delco coil has been
sold with the connector colors reversed, which resulted and hard to diagnose
engine problems. So make sure the new coil looks like the old one, or looks
like the one in the pictures here.
Now reinstall the shaft and rotate it. The little "fingers" should not touch their
counterparts, and the distance should be even. Carefully bend the fingers or counterparts if necessary.
When installing a new ignition module, there are a few things to watch out for, unless
you enjoy being stranded again in a short while:
I really recommend the use of GM or AC/Delco ignition modules, I've personally had bad experiences
with aftermarket module. The choice is yours, but you have been warned.
Use the heat dissipant grease that comes with your new module, if you don't, it will overheat and die in no time.
Don't be cheap and buy the ignition module screws, they provide ground to the module, and if they corrode,
you may get a bad ground. They have become quite expensive, so a cheaper alternative to those
$5 screws may be to cut different threads in the distributor base and use standard screws.
The O-ring should be replaced every time you remove the distributor, because heat and
oil make the o-ring hard after a short while, it loses its ability to keep the oil
inside the engine. Remember: the oil pump is right under the distributor, and this is one of
the most common Fiero oil leaks! So, put a light coat of new engine oil on the o-ring
and slide it into its groove.
Now, this is the moment to reinstall the washers on the shaft and reinstall the gear.
You may need more washers to remove the play in the distributor, but make sure
the distributor still turns freely! Make sure the orientation of the hole is the
same as it was before disassembly, the put the spring back into the gear to lock
it to the shaft. Install the new rotor, and you're almost done!
Just install the distributor in the position it was in before removal, and
set the timing to specifications (don't forget to set the A-B ALDL jumper when you do!),
it is imparative that you do, no matter how well you marked the position of
distributor and rotor.
 One of the most common causes of problems with the Fiero are ignition related, and
apart from bad spark plugs and frayed ignition wires the distributor is often at fault.
The ignition module can easily be replaced, but the pickup coil is usually as old as
the module, and this should be reason enough to rebuild the entire distributor - it's
not that difficult. This article illustrates the steps necessary to rebuild the
distributor, what to look out for, and hopefully the pictures help you in the process.
As always, I'd be grateful for a nice entry in my guestbook! Oh, you can click on
most images for a detailed view!
One of the most common causes of problems with the Fiero are ignition related, and
apart from bad spark plugs and frayed ignition wires the distributor is often at fault.
The ignition module can easily be replaced, but the pickup coil is usually as old as
the module, and this should be reason enough to rebuild the entire distributor - it's
not that difficult. This article illustrates the steps necessary to rebuild the
distributor, what to look out for, and hopefully the pictures help you in the process.
As always, I'd be grateful for a nice entry in my guestbook! Oh, you can click on
most images for a detailed view!