This is a description of the Fiero headlight systems. I tried to be basic and
point out the differences and common problem areas. If in doubt, by all means,
refer to the Helms manuals for schematics. Don't let your car be a "one eye up"
Fiero. After all, Fiero means "I am proud".
First of all, let me make a few basic comments. The Fiero uses two and only two
different headlight systems: one for all 1984-1986 Fieros, the other for the
87/88 Fieros. But since some people have modified their cars or for cars made
at the end of the model year, some confusion may still arise.
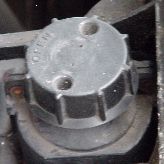
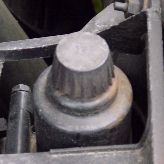
So, here is the simple method of telling the two apart: there is a knob on top
of the headlight motor. The picture on the left shows the
84-86 system with the
old knob, the right shows the
87/88
system with the newer, tapered knob.
The wiring colors are from the 1984 and 1987 Helms manuals, other years may
vary (Donations in the form of 1985, 1986 and 1988 Helms manuals are welcome).
The 1984-1986 System
The older headlight motor system is a complicated assortment of relays, motors and
switches. No wonder, since the whole system works electromechanically.
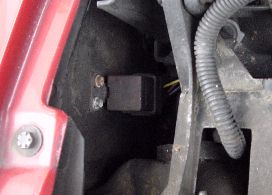
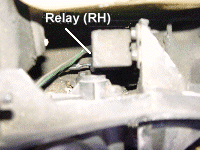
Let's begin with the headlight switch in the instrument panel. This switch
controls the isolation relay near the left headlight (see picture on the left).
This relay in turn controls two more relays, one for each side. And these relays
provide power to the motors, and if all is in working order, the motor begins to turn.
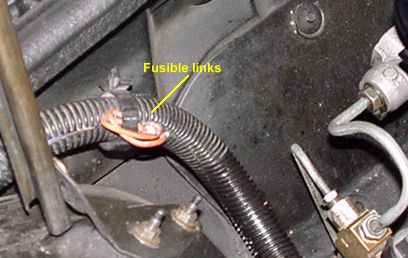
Each motor is powered through its fusible link for protection (these are pieces of wire that act as a
fuse when the motors draw too much current).
Once a motor hits the limit, a bumper inside the headlight motor slows down the motor
to a halt. Once the gear inside the motor housing can no longer turn, the worm gear at the
end of the motor will cause move up, which in turn triggers a limit switch which turns off the current.
Phew!
When you turn off the headlight switch, this is what happens: the isolation relay (which was energized
up until now), turns off. This also turns off the two headlight relays, which reverses the polarity at the
motors. The isolation relay now directly provides power to the headlight motors through the
headlight switch (!) and a 20 amp fuse. When the motor hits the limit, the limit switch turns off the motors
similarly to what happens when the headlights go up.
In order to be able to drive around with a broken system, disconnect the connector with the blue
wire (see image). This prevents the motor from going down. Caution: This does not prevent the
motor from going up!!! So be cautious! Once the connector is open, turn the knob on top of the motor
in the direction of the arrow until the headlight is fully open. You'll hear/feel a "click", this
is the limit switch.
1984-1986 Troubleshooting
First of all a word of warning: The headlight system is powered at all times, even with the ignition off!!!
And those motors are pretty strong, so be careful when fumbling around with the system, of you
can easily hurt yourself pretty badly! Disconnect the battery if you have to insert your hands into the mechanism.
This complicated system can suffer from a variety of failures, ranging from mechanical to electrical defects.
That's why it's important to make an exact diagnosis:
Is the problem on only one side or both?
Does the headlight(s) not go up, or down, or both?
The most common causes are in short form:
Both sides do not open: Isolation relay, headlight switch
Both sides do not close: TAIL-Fuse, headlight switch, isolation relay
One side does not open: Fusible link, headlight relay, defect inside motor assembly
One side does not close: headlight relay, defect inside motor assembly
If one motor keeps spinning audibly or visibly, look no further, you need to rebuild
the motor assembly.
Detailed troubleshooting
Locate and remove the isolation relay. Disconnect the connector. This is a two part connector with
a lock, don't break it! The input side has three wires: yellow, white and black. Black is ground.
Measure voltage between yellow and black. There should be 12V when the headlight switch is in the
"on" position, and no voltage otherwise. Now measure voltage between white and black. There should
be 12V when the headlight switch is in the "off" position, and no voltage otherwise. If any of these
tests fails, the problem is in the wiring of the headlight switch itself. And don't forget to
check the fuses!
The output side also has three wires: pink, blue (LH) and blue/white (RH). Turn the headlight
switch to "on". With the relay still removed, momentarily touch the pink and yellow wire contacts
with a jumper wire. The motors must go up a bit (unless they're already open all the way).
Now momentarily touch blue or blue/white with the jumper. The respective motor should
go down a bit. If none of the tests fail, you probably have a bad isolation relay.
Reinstall the isolation relay and continue on the side with the problem and check the headlight relay.
Again, remove the relay, disconnect the connector, watch the lock. The input side has three wires,
the output side has two wires. Measure the voltage between the red and black wires on the input side,
there should be battery voltage at all times, or you have no ground or a blown fusible link.
Check if there is 12V between pink and black with the headlight switch in the "on" position.
If not, check the wiring between the isolation relay and headlight relay. Disconnect the single
connector with the blue wire. The side going to the relay (blue) must carry 12V measured to ground
if the headlight switch is in the "off" position.
If everything is ok up to now, the motor should work, if the relay is not shot. So momentarily
jumper the grey wire on the relay connector to ground and green to 12V. The motor should turn.
Then jumper green to ground and the single wire to 12V. The motor should turn the other direction.
If it does, the relay is shot, if not, it's the motor.
Rebuilding the motor
If the motor does not run at all, the most common cause is a defective limit switch/brush assembly.
This part may have lost a brush, which can be fixed by soldering the old brush or a new one to the
assembly where the old part has fallen off. You can also get a new brush assembly, but it's
discontinued from GM, so you have to either scour the yards or contact Rodney Dickman.
If the motor does run, but the mechanics doesn't or only after helping it a little, the internal
gear is probably missing a few teeth. Rodney and others offer rebuild kits containing new
gears, bumpers and new grease to rebuild the mechanical parts of the system.
The 1987/88 System
The 1987/88 system was a huge improvement over the older system. It is a lot more
reliable because the electromechanical components were replaced by a central control module.
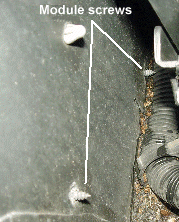
This is unfortunately quite inaccessible hidden under the left fender. If you remove the
wheel well, you will gain some access to it (the picture shows the two mounting screws).
Anyway, this module controls all aspects of the two motors. If the motors hit an obstacle, the
current through the motor rises, and the module shuts down the motor immediately. The motor
contains an additional protection: the motor shaft and the actuator are connected through
a coupling consisting of three Delrin cylinders. If for some reason the control module should
not shut down the motor in time, the cylinders disintegrate and protect the rest of the
components from damage. The only problem here is, that the Delrin cylinders have become
brittle over time and sometimes break unnecessarily. But they are easy to replace
for a few bucks.
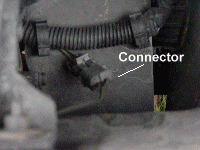
This system too can be disabled: each motor has a connector (see image), which completely
disables the respective motor (up and down), which is safer than the old system.
1987/88 Troubleshooting
Again, let me start with a word of warning: the headlight system is powered at all times!!!
And the motors are strong, so be most careful when handling the headlight system components,
or bodily injury may occur! Disconnect the battery when working on the headlight system.
Since the system is simpler, troubleshooting should be simpler as well, if it were not for
the mounting location of the control module. So, first check what's easy to check.
Does the knob on the motor turn, but the mechanics doesn't? Then it's most likely the
Delrin cylinders, so remove the motor and replace the parts.
If both sides don't close, it may be the TAIL fuse as with the old system. If both sides don't
open, check the headlight switch. The motors are next. Remove the connector (see picture).
Manually move the knob and bring the headlight to the halfway up position. Momentarily apply
12V and ground through a fused jumper to the connector. If nothing happens, the motor is shot.
If all was well up to now, the fun begins. Remove the wheel well or fender or both. Leave the
module in the car, just disconnect the two connectors (watch the connector locks!).
The larger one has 5 wires: yellow (A), red (B), white (C), black (D), red (E).
B and E must carry 12V at all times (measured towards D), or the module doesn't get power.
B is for the left motor, E for the right motor. So if one side doesn't work and there
is no power on the respective wire, check and replace fusible links or wiring.
If there is power to the module, check if A carries 12V if and only if the headlight switch
is in the "on" position. Then check if C carries 12V if and only if the headlight switch
is in the "off" position. If this is not the case, check the wiring and headlight switch, don't
forget the TAIL fuse.
If everything works out, reconnect the headlight motor connectors at the motors. With the
connectors at the module still disconnected, apply 12V and ground to the dk green and grey
wires at the smaller (4 way) module connector for the RH motor, or lt green/black to grey/black
for the LH side using a fused jumper. (Manually move the motors to the half way up position because
you don't know which direction they'll start moving. If the motors work, it seems like you have
a bad module. But I have never seen one fail, this part is amazingly tough, and modules from otherwise
totally wrecked cars were still working.
The new system looks a lot like the Corvette system from that time, so I wouldn't be surprised
if some parts or even the module were compatible or identical.
As stated before, the single most common failure with this system are the delrin cylinders, and they
are easy to come by and simple to change.
Where to get parts
The headlight and isolation relays can be bought from GM, and if they're ever discontinued,
one can improvise using regular relays. The new headlight motors are expensive from GM,
and used parts always carry the risk of failing again soon. That's why I prefer rebuilding.
Internal components are not or no longer available through GM. The only source for all 84-86
headlight system parts is (to my knowledge)
Rodney Dickman. His parts
are OEM components that he got from the company that used to make the headlight motors for GM,
not aftermarket stuff.
He also carries the Delrin cylinders, but you can also get those at Eckler's Corvette
(since the motors are almost identical). However the Corvette cylinders are slightly larger
and have a hole, so Rodney's are a better choice. (Note: I have no connection with Rodney
other than as a satisfied customer).
I'm sure you can get the control module from GM, but you can easily get this one used, there
is pretty much no wear on these. And if the Corvette module is identical (which I don't know
for sure), you can get that one from Eckler's too.
There have been
visitors to this site since May 31, 2000.
 First of all, let me make a few basic comments. The Fiero uses two and only two
different headlight systems: one for all 1984-1986 Fieros, the other for the
87/88 Fieros. But since some people have modified their cars or for cars made
at the end of the model year, some confusion may still arise.
First of all, let me make a few basic comments. The Fiero uses two and only two
different headlight systems: one for all 1984-1986 Fieros, the other for the
87/88 Fieros. But since some people have modified their cars or for cars made
at the end of the model year, some confusion may still arise.
 The older headlight motor system is a complicated assortment of relays, motors and
switches. No wonder, since the whole system works electromechanically.
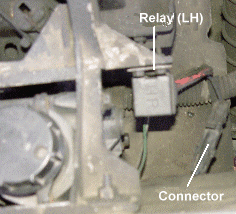
Let's begin with the headlight switch in the instrument panel. This switch
controls the isolation relay near the left headlight (see picture on the left).
This relay in turn controls two more relays, one for each side. And these relays
provide power to the motors, and if all is in working order, the motor begins to turn.
Each motor is powered through its fusible link for protection (these are pieces of wire that act as a
fuse when the motors draw too much current).
The older headlight motor system is a complicated assortment of relays, motors and
switches. No wonder, since the whole system works electromechanically.
Let's begin with the headlight switch in the instrument panel. This switch
controls the isolation relay near the left headlight (see picture on the left).
This relay in turn controls two more relays, one for each side. And these relays
provide power to the motors, and if all is in working order, the motor begins to turn.
Each motor is powered through its fusible link for protection (these are pieces of wire that act as a
fuse when the motors draw too much current).
 When you turn off the headlight switch, this is what happens: the isolation relay (which was energized
up until now), turns off. This also turns off the two headlight relays, which reverses the polarity at the
motors. The isolation relay now directly provides power to the headlight motors through the
headlight switch (!) and a 20 amp fuse. When the motor hits the limit, the limit switch turns off the motors
similarly to what happens when the headlights go up.
When you turn off the headlight switch, this is what happens: the isolation relay (which was energized
up until now), turns off. This also turns off the two headlight relays, which reverses the polarity at the
motors. The isolation relay now directly provides power to the headlight motors through the
headlight switch (!) and a 20 amp fuse. When the motor hits the limit, the limit switch turns off the motors
similarly to what happens when the headlights go up.
 The 1987/88 system was a huge improvement over the older system. It is a lot more
reliable because the electromechanical components were replaced by a central control module.
This is unfortunately quite inaccessible hidden under the left fender. If you remove the
wheel well, you will gain some access to it (the picture shows the two mounting screws).
The 1987/88 system was a huge improvement over the older system. It is a lot more
reliable because the electromechanical components were replaced by a central control module.
This is unfortunately quite inaccessible hidden under the left fender. If you remove the
wheel well, you will gain some access to it (the picture shows the two mounting screws).
 This system too can be disabled: each motor has a connector (see image), which completely
disables the respective motor (up and down), which is safer than the old system.
This system too can be disabled: each motor has a connector (see image), which completely
disables the respective motor (up and down), which is safer than the old system.