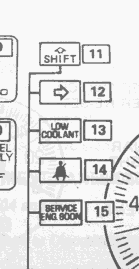
While browsing through the 87 Helms manual, I stumbled across the drawing of the instrument cluster on page 8C-8 (see picture). As you can see, Pontiac obviously planned to use the center right indicator light for a low coolant indicator. On cars without the voltmeter this indicator is used for the battery "idiot light". But the GT had the voltmeter as standard from 86 on, so this light was no longer needed.
Curiously, the same "Low Coolant" indicator appears even in the 87 Owner's manual! Check out the pictures on pages 2A-1, 2C-1 (Not in the magnification, but on the smaller view below), 2C-8, etc. It looks like they went ahead quite a bit and cancelled this feature late. Reason enough for me to check into this further.
So I thought, "why not finish what Pontiac started"? What's necessary for a low coolant indicator? Only a few items:
Actually, I had to start looking for the right location for a sensor. I chose the coolant recovery bottle, because it's the only part of the cooling system that's not pressurized. This way the least damage would occur if a component that I've added fails. I wanted to light the warning indicator if the level in the coolant recovery bottle drops below the "min" line. I see there are two ways of doing this. One is to keep the bottle intact and put two holes into the recovery bottle cap, inserting two rods or something similar into the bottle through the cap. This is NOT the radiator cap, but the plastic cap on the coolant recovery bottle! The length of the two rods must be cut so that both rods are in the coolant while the level is okay, but are no longer in the coolant if the level drops too low. I refer to this as the "cheapo solution".
The better solution is to use a real coolant sensor. Actually, this basically the same thing as the cheapo solution, only looks more professional. It consists of a sensor with a connector, and a mating connector. You drill a hole into the bottle and screw the sensor into the bottle and seal it. Make sure the sealant is heat resistant, because is may come in contact with the hot coolant escaping from the radiator. The "sensor" is nothing but two rods that stick out into the fluid. So electrically, everything from now on is the same for both solutions.
One of the two wires (it doesn't matter which one) can be connected directly to ground. Just find a clean, good ground somewhere near the bottle. Simple enough. The other wire is the input to the electronic unit.
The electronic unit has the task of measuring if there is fluid between the two sensor contacts, because the fluid does not conduct enough current to drive a lamp. To prevent corrosion of the sensor because of the current flowing through the fluid, an electronic module uses an AC signal and measures the attenuation of the signal caused by the fluid.
Again, you have two choices. You can use a unit from another GM vehicle, or even other brand, as long as it has an input to ground and grounds the output if the input senses no fluid. Or you can build one yourself. There are many applications on the market, I used a design based on the LM1830 chip from National Semiconductor. The chip itself is about $5 and needs a minimum of external components. If there is sufficient interest, I'll put up a drawing of the schematics. I bought a relay and removed the guts so that all that was left was the relay body and connector contacts. I made a small board with the LM1830 chip and an open collector output to ground to drive the lamp. The tiny relay can be mounted anywhere, preferably where switched battery power and ground are easily availabe, e.g. near the blower motor. At this point you can run a test and connect the output of the electronic unit to a small test light to battery. The light should light if you disconnect the sensor connector or remove the cap from the bottle and pull the rods from the liquid. Route the output wire to the instrument cluster.
The center right lamp is probably unused on your vehicle, so you need to get a lightbulb and socket, and install it into the IP-cluster. The two contacts were supposed to be there for the battery charge indicator. They go to connector pins 5 and 6. One of them carries 12V when the ignition is in run. Perfect. The other one needs to be cut. You don't want two battery lights, do you? Connect the wire from the electronic unit to the open end of the wire at the connector. You're done! At least electrically...

What good is the low coolant light if it doesn't say "Low Coolant"? You have several options here, depending on your car. On some cars, the indicator is blank = black. Tough luck. If you want anything else here, either cut out the center symbol or use some kind of paint thinner to remove the color from the center symbol not destroying the RH turn signal or seatbelt indicators. Good luck.
If you have a battery symbol, you have the same problem, because you probably won't get rid of the battery symbol unless you use a cutting device of some kind.
I was lucky, because on my car the indicator was blank, but solid orange/red. This was very fortunate. So all I needed was some writing on clear plastic that said "Low Coolant", and glue this behind the orange indicator already in the car. It looks perfect (see picture). I scanned the "Low Coolant" symbol from the 87 Helms manual and printed it on a transparency. You can either do the same, or paint a fancy symbol or otherwise use your imagination. I'm a sucker for stock look, and this is what it would have looked like.
What if you were not as lucky and had to use the cutting method? Well, you can still do what I did, but instead of reusing the unused orange space, cut the old symbol and improvise.
One thing left to do is maybe add a bulb test. I did this, because what good is a warning light if the lamp
can go bad and you don't get the warning after all? So, I wired the lamp circuit to a bulb test
circuit, and decoupled the two lines with diodes. (You don't want another lamp to come on as well if you get low
on coolant, do you? That would be sort of like a single warning lamp instead of your cluster saying:
"There is a problem". We're not Micro$oft, so we're not doing that.)
I'll leave that one as an exercise to the reader. Email me if you'd like to know more.
There have been
visitors to this site since May 31, 2000.